DOCKER NETWORK
A docker network is an integral part of docker that provides us the facility to create virtual network interfaces inside our host machine or span over multiple hosts to attach multiple containers and enable communication between them. Docker provides us with 6 types of networks.
- bridge
- host
- overlay
- none
- macvlan
- ipvlan
Let’s take a look at them in detail.
BRIDGE NETWORK
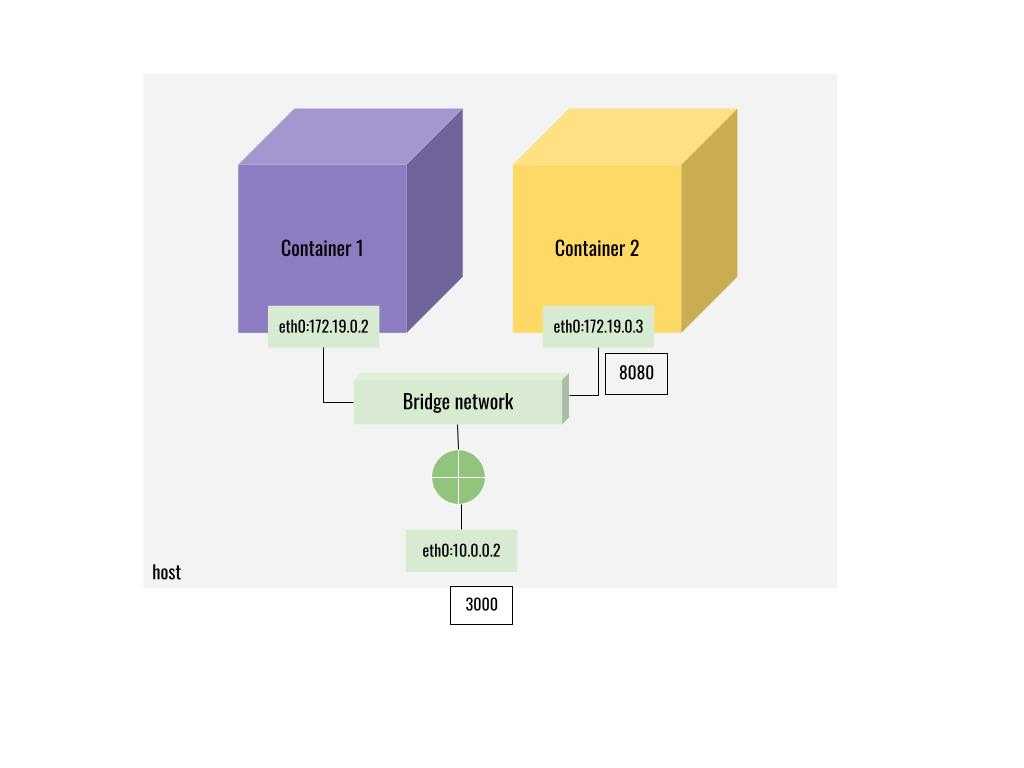
A Bridge network is the default network created by docker if you don’t specify a type of network while spinning up the containers. Bridge networks are created as separate networks detached from the host machine. You can attach any container to a particular bridge network and containers attached to a bridge network can communicate with each other. So when you want to expose a port from a container to the host you have to publish the port when you run the container while connected to a bridge network. When you want applications/services that need to connect to a container that is attached to a bridge network must publish its port in order to accept incoming connections. The bridge network also acts as a NAT.
Let’s create a bridge network with the name demo_network by running the following command
docker network create demo_network
Now let’s check the our new network
docker network ls

NETWORK ID     NAME      DRIVER    SCOPE
f27f5025d482   bridge            bridge    local
e3f1d54f0884   demo_network      bridge    local
161a0b7952fd   host              host      local
093136892ac3   none              null      local
As you can see our bridge network with the name demo_network has been successfully created. Docker will automatically create a network interface in our host. Let’s inspect the interface with the network id.
ip a | grep e3f1d54f0884
12: br-e3f1d54f0884: <NO-CARRIER,BROADCAST,MULTICAST,UP> mtu 1500 qdisc noqueue state DOWN group default
    inet 172.19.0.1/16 brd 172.19.255.255 scope global br-e3f1d54f0884
As you can see docker has created a new network interface with id br-e3f1d54f0884 and has a subnet 172.19.0.1. Docker will provide a DHCP server and will automatically assign IP addresses to the containers attached to that particular network from the network interface’s subnet.
Now, let’s run an Nginx container and attach it to our bridge network.
docker run -p 80:80 --network demo_network --name demo_nginx nginx
Here with -p flag, we are publishing our container port to our host.
The port mentioned on the left side is our host port and the port mentioned on the right side is our container port.
Similarly, we can publish multiple ports from our container to our host using a bridge network.
Now if you go to localhost in the browser we can see the Nginx server’s welcome page.
Now let’s inspect our bridge network and check whether our container is attached to the network by running the following inspect command.
 docker network inspect demo_network
[
    {
        "Name": "demo_network",
        "Id": "e3f1d54f08840f25890f6f55b16416e9ce283cd35d273b14646719dec3ffcdd9",
        "Created": "2022-09-10T00:20:51.798232182+05:30",
        "Scope": "local",
        "Driver": "bridge",
        "EnableIPv6": false,
        "IPAM": {
            "Driver": "default",
            "Options": {},
            "Config": [
                {
                    "Subnet": "172.19.0.0/16",
                    "Gateway": "172.19.0.1"
                }
            ]
        },
        "Internal": false,
        "Attachable": false,
        "Ingress": false,
        "ConfigFrom": {
            "Network": ""
        },
        "ConfigOnly": false,
        "Containers": {
            "caf881c9ec3bc6d6b711aad2640b8e26ba365dbcaab3ae0a91d98d4cfb982831": {
                "Name": "demo_nginx",
                "EndpointID": "0403d8ed262db4c77d5269219255b1d4dc2e8edd9a7c5638900f0dd08b910a3e",
                "MacAddress": "02:42:ac:13:00:02",
                "IPv4Address": "172.19.0.2/16",
                "IPv6Address": ""
            }
        },
        "Options": {},
        "Labels": {}
    }
]
As you can see our Nginx container with the name demo_nginx is attached to the demo_network and has been assigned an ipv4 address and a mac address.
Under IPAM object you can see the network’s subnet & gateway information. Similarly, when we attach multiple containers to a bridge network all the containers will be assigned an internal IP address and can communicate within the subnet created by the bridge network.
The container will also be reachable via its IP address from the host or from other containers in the same bridge network.
Let’s run one more instance of the Nginx container and attach it to the same bridge network.
docker run -p 81:80 --name demo_nginx_2 --network demo_network nginx
Now one more Nginx instance it running and can be accessed from port 81.
Let’s inspect the demo_network now.
docker network inspect demo_network
"Containers": {
            "3112806d35ec4c9e4e63af65221b182d2bbe74274e7ee33fa0ef1e8d4e02694f": {
                "Name": "demo_nginx",
                "EndpointID": "de715e7c4f41fe8e11ad10df6722720f82351db493a66974bd71fffd1a4cd060",
                "MacAddress": "02:42:ac:13:00:03",
                "IPv4Address": "172.19.0.3/16",
                "IPv6Address": ""
            },
            "81acc134c66a3556d108b6b64c5d415b2badc0ab1da29e9621b240fb06adb6eb": {
                "Name": "demo_nginx_2",
                "EndpointID": "12d3f8143dd31341f31b862f875ef8373b3b2acf156366ebe00f518c979dd52c",
                "MacAddress": "02:42:ac:13:00:02",
                "IPv4Address": "172.19.0.2/16",
                "IPv6Address": ""
            }
        },
As you can see there are two containers attached to our demo_network now and one container can reach the other container using the IP address or the DNS.
NAME RESOLUTION
Yes, docker provides name resolution with its network. To reach a container via its DNS its container name can be used as the domain name. For instance, http://demo_nginx can be used to reach our first Nginx container from other containers in our bridge network.
HOST NETWORK
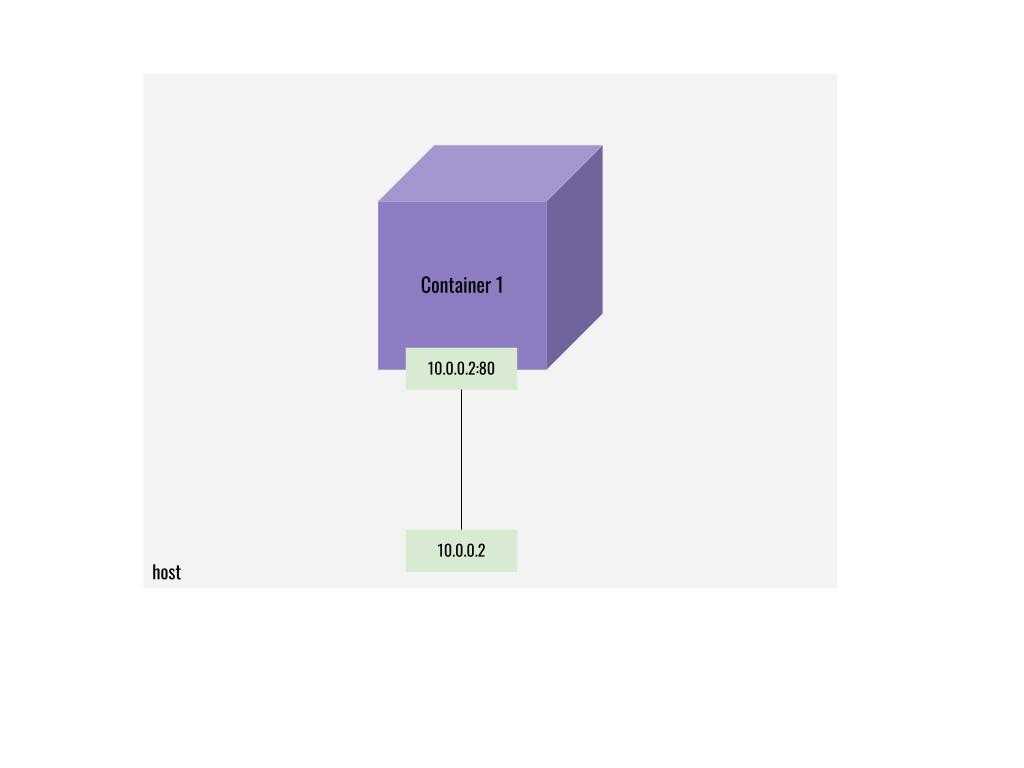 Sometimes for specific use cases, we don’t want our containers to be isolated from the host network. Sometimes we want our container to connect to other services running on our host machine and vice versa and use the same host’s routing table. In this scenario, we can opt for a host network.
A host network uses the host’s network instead of creating an isolated network inside the host. Containers that are attached to the host network expose & bind all the ports that are exposed by default. When a host network is used you can ignore the -p flag while running the containers.
lets inspect our networks now.
docker network ls
f27f5025d482   bridge            bridge    local
e3f1d54f0884   demo_network      bridge    local
161a0b7952fd   host              host      local
093136892ac3   none              null      local
The third network listed in the above list is the default host network created by docker. Let’s try to run our Nginx container in host mode.
First, let’s stop our running container
docker stop demo_nginx
Now lets run the following command.
docker run --network host --name demo_nginx
Now if we check localhost we can see the Nginx welcome page.
Let’s inspect our host network now.
docker network inspect host
docker inspect host
[
    {
        "Name": "host",
        "Id": "161a0b7952fdfffcbfa5c741113553b0b0675b2b92bab6d3076d17b4685324bc",
        "Created": "2022-08-04T20:05:51.246552587+05:30",
        "Scope": "local",
        "Driver": "host",
        "EnableIPv6": false,
        "IPAM": {
            "Driver": "default",
            "Options": null,
            "Config": []
        },
        "Internal": false,
        "Attachable": false,
        "Ingress": false,
        "ConfigFrom": {
            "Network": ""
        },
        "ConfigOnly": false,
        "Containers": {
            "fafc970ecad5f138ef0167dbc2107a9e6a951ba41b9434fadd090a990e3cccce": {
                "Name": "demo_nginx",
                "EndpointID": "82a64f3f25cbe4e23de5238939ec02e285fbe149e4efb591df8467cfb7b093ef",
                "MacAddress": "",
                "IPv4Address": "",
                "IPv6Address": ""
            }
        },
        "Options": {},
        "Labels": {}
    }
]
Our demo_nginx container is now attached to our host network. If you inspect it carefully it does not have an IP address or mac address because it is directly attached to our host network interface and uses the same routing table provided by our host. The container will be reachable from all the network interfaces of the host as mentioned below.
- localhost
- lan ip address
- default address of any bridge network in the host (172.17.0.1,172.xx.x.x etc..)
- 0.0.0.0
OVERLAY NETWORK
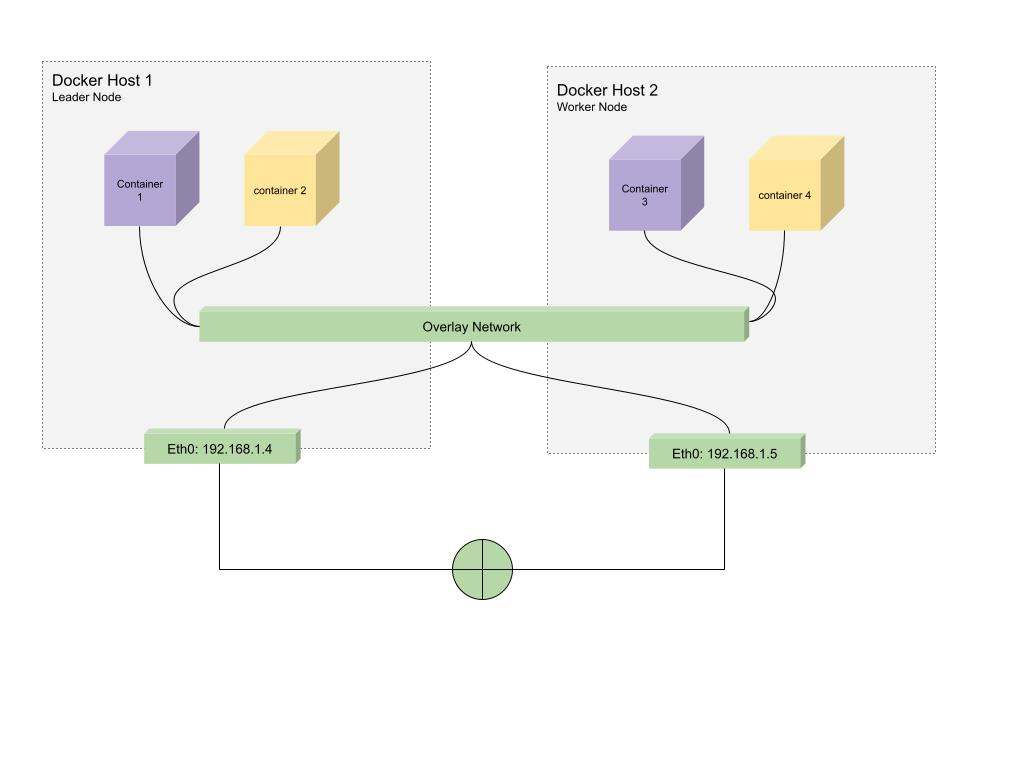 The overlay network which is created from the overlay network driver creates a distributed network among multiple docker daemon hosts and allows us to attach containers running on different machines / vms to communicate with each other.This is the default type of network docker swarm operates on.Docker handles routing of each packet to and form the correct docker daemon host to the correct destination container.
For the demo purpose I have 2 machines one is an EC2 instance on AWS and the other one is my local machine.
The idea is to make the EC2 instance as the Leader Node & my local machine as the worker node and attach containers from both the machines to the same overlay network.
Let’s initialize a docker swarm in the EC2 instance by running the following command.
docker swarm init
Swarm initialized: current node (kvtgdbzf0ljc3ndlicoh905d5) is now a manager.

To add a worker to this swarm, run the following command:

    docker swarm join --token SWMTKN-1-3avltus0jj4teys1pd7bifsg2rdw06vc2bjo3zwnt26kq2jnpo-4kl1g8vg359dzvvxoour3z3a4 172.31.0.245:2377

To add a manager to this swarm, run 'docker swarm join-token manager' and follow the instructions.
Now we have made the EC2 instance the Leader node and docker has given us the token to join the swarm network created in the EC2 instance.
Let’s list the networks in our EC2 machine and check whether we have got an overlay network created.
docker network ls
NETWORK ID     NAME              DRIVER    SCOPE
e033f9ad66eb   bridge            bridge    local
d06f36c799b9   host              host      local
-------------------------------------------------
qucbtn87zi4h   ingress           overlay   swarm |
-------------------------------------------------
b846c8d063d9   none              null      local
We can see the network. Now let’s try to connect our local machine to the EC2’s swarm leader node.
Let’s run the following command in our local machine with the token provided by our leader node. (For the demo purpose I have exposed the port in the EC2 instance and used its public IP to connect)
docker swarm join --token SWMTKN-1-3avltus0jj4teys1pd7bifsg2rdw06vc2bjo3zwnt26kq2jnpo-4kl1g8vg359dzvvxoour3z3a4 x.xx.1.64:2377
This node joined a swarm as a worker.
Now we have the successful confirmation that our local machine has connected to our loader node.
Let’s verify the list of nodes by running the following command in our leader node (EC2 instance).
docker node ls
ID                            HOSTNAME          STATUS    AVAILABILITY   MANAGER STATUS   ENGINE VERSION
kvtgdbzf0ljc3ndlicoh905d5 *   ip-172-31-0-245   Ready     Active         Leader           20.10.17
j895nmv7icty9wlpxq31dwmio     msi               Ready     Active                          20.10.17
As you can see our local machine msi has joined the swarm network and is listed as a worker node.
Now let’s create our overlay network using the following command in our leader machine (EC2).
docker network create -d overlay demo_overlay
a6uljttnuefsz50dcdrh39zpj
Let’s list the network to verify the newly created overlay network in the leader node.
docker network ls
NETWORK ID     NAME              DRIVER    SCOPE
e033f9ad66eb   bridge            bridge    local
--------------------------------------------------
a6uljttnuefs   demo_overlay      overlay   swarm  |
--------------------------------------------------
d06f36c799b9   host              host      local
qucbtn87zi4h   ingress           overlay   swarm
b846c8d063d9   none              null      local
As you can see our newly created demo_overlay network is listed.
Now let’s create a docker service and run 4 replicas across our leader node and worker node.
(We have to run this command in the leader node).
docker service create --name nginx_overlay --network demo_overlay --replicas 4 nginx
kzdp929k3cin4x3pumddx3bt5
overall progress: 4 out of 4 tasks
1/4: running   [==================================================>]
2/4: running   [==================================================>]
3/4: running   [==================================================>]
4/4: running   [==================================================>]
verify: Service converged
Now our service has been scaled to 4 replicas.Lets verify the same by listing the services.
 docker service ls
ID             NAME            MODE         REPLICAS   IMAGE          PORTS
kzdp929k3cin   nginx_overlay   replicated   4/4       nginx:latest
As you can see our service has been provisioned and 4 replica containers were created across our 2 machines. Let’s verify our running containers now. Let’s inspect our demo_overlay network now on the Leader node (EC2).
docker network inspect demo_overlay
"Containers": {
            "ab7e4225f96e53bddc5ce0220a5b996773e9cde68b0afe5b1527bad71c5e7756": {
                "Name": "nginx_overlay.4.9dt3kjr0wrbu9pq6svoyp1l92",
                "EndpointID": "fcd3d9709945562d5a70998f63d2777da3d01b1629d13d3ca7f776bc2828bf15",
                "MacAddress": "02:42:0a:00:01:08",
                "IPv4Address": "10.0.1.8/24",
                "IPv6Address": ""
            },
            "ae0cd122fa7d0146f122f4f8db68f61354d433d196e1c82b2ab474c9a1bce5f6": {
                "Name": "nginx_overlay.1.j8wlqxtsokuirco7mlxs21bvn",
                "EndpointID": "0f70db4ee2c09dc9a240c45fc73316b7521f803d027e193bb28f6ee1e1ee196b",
                "MacAddress": "02:42:0a:00:01:03",
                "IPv4Address": "10.0.1.3/24",
                "IPv6Address": ""
            },
            "lb-demo_overlay": {
                "Name": "demo_overlay-endpoint",
                "EndpointID": "2c6d702f1d4a851eec34b9b631edf5bb7198796d536bfd8bd94af5d5c62dde4a",
                "MacAddress": "02:42:0a:00:01:06",
                "IPv4Address": "10.0.1.6/24",
                "IPv6Address": ""
            }
We are seeing replica 1 & 4 Nginx containers attached to this overlay network. Now let’s verify the containers in our worker node (local machine).
docker network inspect demo_overlay
 "Containers": {
            "2a7cfe0d9c9f303b9b95c2395ff97f2a4496d6511e0ffcfea800c3de12c84e06": {
                "Name": "nginx_overlay.2.3mygcav5ci91ar3rpur6oq4vw",
                "EndpointID": "a57e53852484b17e65a56eee60dbc633365e48be7eafc6b7bbbc735bcc43f68a",
                "MacAddress": "02:42:0a:00:01:04",
                "IPv4Address": "10.0.1.4/24",
                "IPv6Address": ""
            },
            "2bd856c88cbc2f875dd01e98f7626836677c069bdb167aecdf36a39207ca96a5": {
                "Name": "nginx_overlay.3.cr1g80kq1ttfffb8v7paoa80d",
                "EndpointID": "f38763b3198a1eeba22234c251c51db0c7fc360102a5a8ad823f645d85cac66c",
                "MacAddress": "02:42:0a:00:01:07",
                "IPv4Address": "10.0.1.7/24",
                "IPv6Address": ""
            },
            "lb-demo_overlay": {
                "Name": "demo_overlay-endpoint",
                "EndpointID": "5efb702b0b2a3087f907181a80935d50554628809741d0483d134d147f29e887",
                "MacAddress": "02:42:0a:00:01:05",
                "IPv4Address": "10.0.1.5/24",
                "IPv6Address": ""
            }
        },
Here we are seeing replica 2 & 3 Nginx containers attached to our demo_overlay network.
Similarly, we can attach and scale n no of containers across machines which co ordinates as Leader & worker nodes using an overlay network.
NONE NETWORK (DISABLE)
 Sometimes we need to run containers in the dark without exposing it to the outside world. In such cases, we can attach our containers to the none network. Containers attached to the none network run in isolation and cannot reach external networks.
Let’s run an alpine os container in interactive mode.
docker run -it --network none --name demo_nginx nginx
Let’s verify whether our container is attached to a none network.
docker network inspect none
"Containers": {
            "4d1dabad2235c77cbfeafaa4ec5a416a483bcf48b82d7192beb88a38ab19be59": {
                "Name": "demo_nginx",
                "EndpointID": "84f46660639e6ad3fa9f898507ccd1383932c920d5f2ebcdb9b2b4bd0f50b20f",
                "MacAddress": "",
                "IPv4Address": "",
                "IPv6Address": ""
            }
        }
As you can see our container is attached to the none network and does not have any IP or mac address assigned.
Let’s try to ping this website from the container.
ping blog.muralikannan.com
ping: bad address 'blog.muralikannan.com'
As you can see our container cannot reach to the external network.
Lets ping localhost and see what happens.
ping localhost
PING localhost (127.0.0.1): 56 data bytes
64 bytes from 127.0.0.1: seq=0 ttl=64 time=0.079 ms
64 bytes from 127.0.0.1: seq=1 ttl=64 time=0.098 ms
64 bytes from 127.0.0.1: seq=2 ttl=64 time=0.098 ms
64 bytes from 127.0.0.1: seq=3 ttl=64 time=0.102 ms
64 bytes from 127.0.0.1: seq=4 ttl=64 time=0.100 ms
We are getting response because the loop back interface is present.Let’s verify the same.
ip addr
1: lo: <LOOPBACK,UP,LOWER_UP> mtu 65536 qdisc noqueue state UNKNOWN qlen 1000
    link/loopback 00:00:00:00:00:00 brd 00:00:00:00:00:00
    inet 127.0.0.1/8 scope host lo
       valid_lft forever preferred_lft forever
Let’s check the route now.
route
Kernel IP routing table
Destination     Gateway         Genmask         Flags Metric Ref    Use Iface
As expected there are no routes present.
Attaching containers to a none network may have rare use cases when we want to perform operations on the machine such as modifying files, backing up local databases, etc.
MACVLAN NETWORK
 From the above examples using a host or bridge network, the container is always reached from the outside network using the host ip address. What if we want to assign a dedicated IP address and mac address to our container instead and make it look like an actual device in our network? This could be for performance reasons or administration reasons. This is where macvlan network driver comes into the picture.
 docker network create -d macvlan --subnet 10.0.0.0/24 --gateway 10.0.0.1 -o parent=wlp2s0 demo_macvlan
cb48906fe94f4a0eb3e5982a51119be1d3d5509bb27238ba873af72ece389636
In the above example I have used my network’s subnet and ip address.Let’s list our networks now.
docker network ls
NETWORK ID     NAME              DRIVER    SCOPE
4ed0d01676d7   bridge            bridge    local
-------------------------------------------------
cb48906fe94f   demo_macvlan      macvlan   local |
-------------------------------------------------
e3f1d54f0884   demo_network      bridge    local
161a0b7952fd   host              host      local
093136892ac3   none              null      local
We can see our newly created demo_macvlan network.
Let’s try to attach our nginx container to it.
docker run --network demo_macvlan --ip 10.0.0.11 --name demo_nginx nginx
Now let’s inspect our demo_macvlan network.
docker network inspect demo_macvlan
"Containers": {
            "cb37f105926e49da50c24ecb45fe79da7f87edbc256053bdff2073dd58f43ea6": {
                "Name": "demo_nginx",
                "EndpointID": "c89e1d6f33c60db82a878f981dc4715b233cb8c6f3bacbafd3753173cd8744ab",
                "MacAddress": "02:42:0a:00:00:0b",
                "IPv4Address": "10.0.0.11/24",
                "IPv6Address": ""
            }
        },
We can see our container attached to the demo_macvlan network and has been assigned with the IP 10.0.0.11 and a mac address. Now this container will show up as another physical device in our network and can be reached through the dedicated IP address (10.0.0.11 in our case).
IPVLAN NETWORK
Ipvlan network driver is pretty much similar to macvlan driver but it does one thing different than the macvlan driver. When we attach a container to a macvlan network interface a unique ip address and a mac address are allotted to the container. But when we use Ipvlan network driver docker will assign the same mac address from our host’s physical interface to the containers attached to it.
CONCLUSION
We have seen all the different types of networks provided by docker and each network provides us with facilities that suits particular use cases.According to our architecture and needs we can choose the desired network type to run our containers.See you in the next post :)
AUTHOR
For any queries / criticism kindly reach out to https://www.linkedin.com/in/murali-kannan/
CITATIONS
https://docs.docker.com/network/
https://docs.docker.com/network/bridge/
https://docs.docker.com/network/overlay/
https://docs.docker.com/network/host/
https://docs.docker.com/network/ipvlan/
https://docs.docker.com/network/macvlan/
https://docs.docker.com/network/none/
Image Courtesy
Photo by GuerrillaBuzz Crypto PR on Unsplash https://unsplash.com/photos/gC_aoAjQl2Q