DOCKER COMPOSE
Docker Compose is a tool that helps us to configure and run multi-container Docker applications. We can define our application’s configuration is a single YAML file and start/stop our multi-container application using a single command.
We can configure our application as a bunch of services where each service will spin up as a separate container.
We can define docker networks and attach our containers to a network and make them communicate with each other.
We can create docker volumes to persist data even after our application is shut down.
We can port forward from docker containers to the host machine to enable access to our application from the host machine.
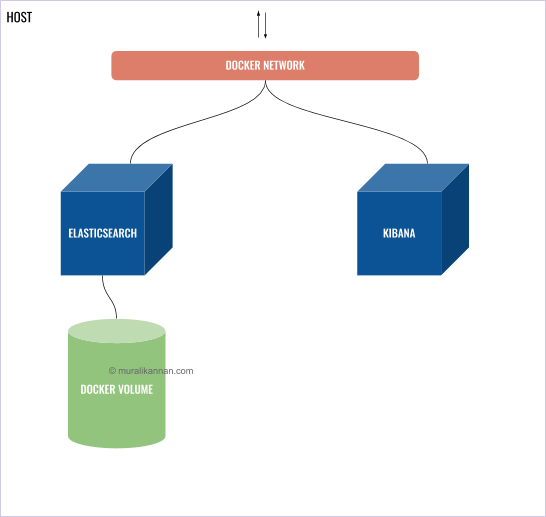
We will explore all these in this post by configuring Elasticsearch & Kibana.
WHAT WE ARE GOING TO DO?
We are going to
- Run Elasticsearch & Kibana in two separate containers.
- Create a Docker Network and attach our containers.
- Create a Docker Volume and hook it up with Elasticsearch to persist data.
- Forward necessary ports to our host machine to allow access to our application from the host machine.
PREREQUISITES
Before we begin we need the following to be installed in our machine
- Docker Installed
- Docker Compose Installed
Run the following commands to verify the installation
docker -v
docker-compose -v

YAML CONFIGURATION
create a docker-compose.yml file and add the following configuration.
IMPORTANT NOTE : Indentation & spaces are very much important in a docker-compose file.
version: '3'

services:
    elasticsearch:
        image: docker.elastic.co/elasticsearch/elasticsearch:7.9.2
        container_name: elasticsearch
        environment:
            - discovery.type=single-node
            - bootstrap.memory_lock=true
            - "ES_JAVA_OPTS=-Xms512m -Xmx512m"
        restart: unless-stopped
        ulimits:
            memlock:
              soft: -1
              hard: -1
        volumes:
            - elasticsearch-data:/usr/share/elasticsearch/data
        networks:
            -elastic-kibana
        ports:
            - "9200:9200"
            - "9300:9300"
    kibana:
        image: docker.elastic.co/kibana/kibana:7.9.2
        container_name: kibana
        environment:
            ELASTICSEARCH_HOSTS: http://elasticsearch:9200
        restart: unless-stopped
        networks:
            -elastic-kibana
        ports:
            - "5601:5601"

volumes:
    elasticsearch-data:
        driver: local

networks:
    elastic-Kibana:
        driver: bridge
Lets go line by line now.
VERSION
version: '3'
To define our docker compose file version.
SERVICES
services:
This is where we will define our services independently.
SERVICE NAME
elasticsearch:
elasticsearch is our service name.
IMAGE
image: docker.elastic.co/elasticsearch/elasticsearch:7.9.2
In this example, we are going to use a pre-built image instead of building one from scratch.
We can add the image name which is available in a public or private Docker registry considering we have access to it. Here we are going to use the official Elasticsearch image.
CONTAINER NAME
container_name: elasticsearch
This will be the name of our container.
ENVIRONMENT VARIABLES
environment:
    - discovery.type=single-node
    - bootstrap.memory_lock=true
    - "ES_JAVA_OPTS=-Xms512m -Xmx512m"
Environment variables can be defined under environments and our application inside our docker container will be able to access it. The environment variables are hardcoded in this example but we can pass the environment variables by creating a .env file or by other usual means as well.
In that case, the env variable can be read as mentioned below in our YAML file.
discovery.type={ENV_VAR_NAME}
RESTART POLICY
restart: unless-stopped
This is our restart policy for our container. Usually, docker supports 4 restart policies.
- no No is the default restart policy and does not start the container under any circumstances
- always Always restarts the container all the time whenever the daemon is ready
- on-failure On-Failure restarts the container if the exit code indicates on failure error
- unless-stopped Unless-Stopped always restarts the container except when it’s stopped manually
VOLUMES
volumes:
    - elasticsearch-data:/usr/share/elasticsearch/data
We can attach a persistent docker volume to our container under volumes configuration.Here we have named our volume as elasticsearch-data and mounted it to /usr/share/elasticsearch/data location.Now whatever data stored in this location in our container will be persisted in our docker volume. This will help us to retain the data even after the container is terminated.
NETWORKS
networks:
    -elastic-kibana
Here we are declaring our network name to which our container will attach to. So containers in the same network can communicate with each other. A service can be discovered by using its service name as DNS.
For example:
Our elasticsearch service can be reached by http://elasticsearch within the docker network.
PORT FORWARDING
ports:
    - "9200:9200"
    - "9300:9300"
Ports from our docker container can be forwarded to our host machine by defining the configuration under ports. Here the left-hand side indicates the container port and the right-hand side indicates the host port. In this example, we have forwarded ports 9200 & 9300 from our elasticsearch container to the same port numbers in our host machine.
VOLUMES & NETWORKS
After defining our service configuration we must add the Volume & Network configuration at the bottom and mention all the volume & network names.
volumes:
    elasticsearch-data:
        driver: local

networks:
    elastic-Kibana:
        driver: bridge
This will instruct docker to create necessary volumes & networks.
KIBANA CONFIGURATION
The fundamentals are the same as our elasticsearch service for kibana. Here we have added a few environment variables & different port to our kibana service.
 environment:
    ELASTICSEARCH_HOSTS: http://elasticsearch:9200
Here we have declared our elastic search host address. As mentioned earlier services can be discovered by using its service name as DNS inside docker networks.
ports:
    - "5601:5601"
Similarly, port 5601 is forwarded here and we can access kibana on port 5601 from our host machine.
VERIFYING DOCKER-COMPOSE.YML FILE
After creating our docker-compose.yml file we can validate the file by running docker-compose config command.It should output the file content if its valid and has no issues.
LET’S START OUR APPLICATION
Now we have done with our configuration let’s start our application.
To start our application all you have do do is run the following command.
docker-compose up
That’s it. Wait for docker-compose to boot our application.
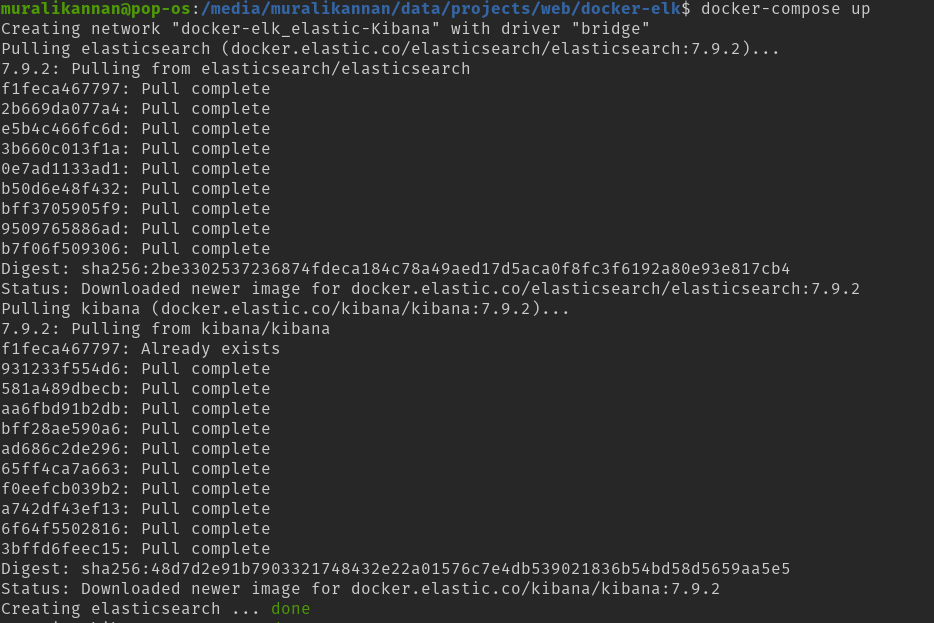
Now Docker Compose will do the following for us
- Pull our Images if it’s now present locally.
- Create Our Docker Network.
- Start our containers.
- Create our Docker Volume if it’s not present.
- Attach our Volume to respective containers.
- Attach our containers to respective networks.
After our application finished booting we can access it using our ports declared in the configuration.
To access Kibana we can type localhost:5601.
Now we should see Kibana’s welcome screen.

Let’s click Try our sample data button to load some sample data.

Let’s click view data -> Dashboard now.
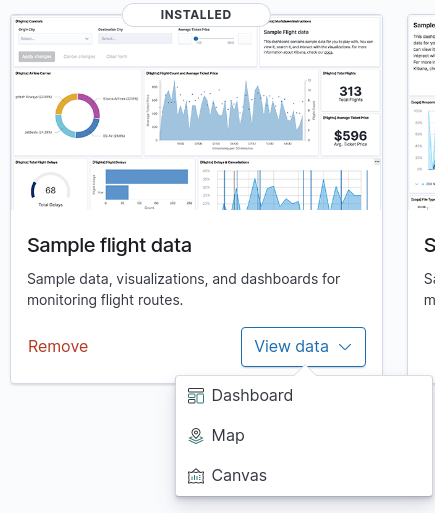
Now we can see our Dashboard loaded with sample flight data & respective visualizations.

We have just started our Elasticsearch & kibana stack with just one command.
We can check our pulled images by running docker images command.

We can check the list of running containers by running docker ps command.

Similarly, we can check our volumes & networks that we have created by running docker volume ls & docker network ls commands respectively.
LET’S STOP OUR APPLICATION
To stop our application all you have do is run the following command.
docker-compose down
That’s it. Wait for docker-compose to stop our application.

Now if we run docker-compose up again our application will start and our data will be retained in our docker volume.
Since we have created a persistent storage volume docker-compose down will not remove the volume it will just stop our containers.
If we run docker-compost-down -v it will remove our volume as well.
Happy Hacking !! see you in a new post :)