ROCKET SCIENCE
Let’s talk about rocket science for a bit now. We have seen rockets carrying payloads into orbit. If you notice the design of the rocket the payload usually resides at the top and the propulsion system will be made of multiple stages.
 Once a propulsion stage is fired up and exhausted it will be discarded letting go of the extra mass which will help the payload escape from the earth’s atmosphere with ease. A similar concept can be applied while building a docker image. We can separate the build process into multiple stages and discard different stages when their job is done. Helping the final image to have a very little footprint with only necessary components in it.
MULTI STAGE DOCKER BUILD
The most challenging thing while building a docker image is to keep its size down.
A multi-stage image will allow you to copy necessary artifacts from one stage to another and leave everything else behind.
A Multi stage docker build has the following advantages.
- Minimal Final Image Size
when we talk about the final image size it’s very important to keep its footprint as low as possible so when transferred to the registry & pushed for deployment the size will impact the storage & data consumption respectively. - Self contained build environments
Since we are compiling our application using docker our environment required to build our app is defined in our Dockerfile itself and the compilation happens inside a container spun as a stage on the fly. This will let us build our app on any machine which just has docker installed and not our build environment set up on the machine itself. - Keeping the secrets safe
Multi-Stage builds can help keep secrets out of the final image.
HOW ITS DONE
Let’s build an Angular UI to understand multi stage docker build.
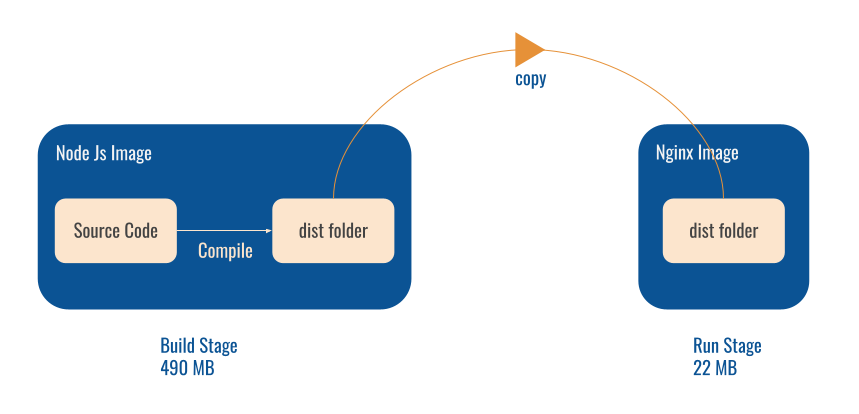
- In the First stage (Build Stage) we will pull a Node Js base image, copy our code, install dependencies & compile our app.
- In the Second stage (Run Stage) we will pull an Nginx base image, copy our compiled dist/ui folder from the Build Stage & build the final image.
Let’s create a new Angular project using the following command and get into it.
ng new ui
cd ui
Let’s create a Dockerfile in the root of the ui folder.
A multi stage build is also achieved through instructions written in a single Dockerfile.
Let’s get started.
FROM node:12-alpine as build-stage
WORKDIR /app
COPY . .
RUN npm i
RUN node_modules/.bin/ng build --prod

FROM nginx:1.18.0-alpine as run-stage
WORKDIR /app/dist
COPY --from=build-stage /app/dist/ui .
COPY nginx-default.conf.template /etc/nginx/conf.d/default.conf
EXPOSE 80
CMD ["nginx", "-g", "daemon off;"]
The Dockerfile has usual instructions and nothing fancy but how we are separating the stages ?
The answer is FROM command.
Whenever you use a FROM command in a Dockerfile a new image is created.
Let’s create our nginx configuration now by adding the following configuration in nginx-config.conf.template file.
server {
  listen  80;

  location / {
    root  /app/dist;
    index index.html;
    try_files $uri $uri/ /index.html;
  }
}
Let’s go through each stage now
Build Stage
FROM node:12-alpine as build-stage
WORKDIR /app
COPY . .
RUN npm i
RUN node_modules/.bin/ng build --prod
- A new image is spun using NodeJS 12 base image based on Alpine Linux.
- Current working directory is set to the app folder.
- Entire contents (source code) are copied into the working directory.
- Dependencies are installed.
- App is compiled. Now the dist folder is created in the working directory (/app) of Build Stage.
Run Stage
FROM nginx:1.18.0-alpine as run-stage
WORKDIR /app/dist
COPY --from=build-stage /app/dist/ui .
COPY nginx-default.conf.template /etc/nginx/conf.d/default.conf
EXPOSE 80
CMD ["nginx", "-g", "daemon off;"]
- A new image is spun using Nginx 1.18.0 base image based on Alpine Linux.
- Working directory is set to /app/dist folder.
- The dist/ui folder is copied from the Build stage to the current working directory.
- Nginx configuration is copied into conf.d folder in the image.
- Port 80 is exposed.
- nginx -g daemon off command is fired to start the Nginx server.
Now let’s build the UI image by running the following command.
docker build -t angular-example .
On successful execution we should see the following output.
Successfully built c19ef2f17f6f
Successfully tagged angular-example:latest
Let’s run our newly built image
docker run -p 80:80 -t angular-example
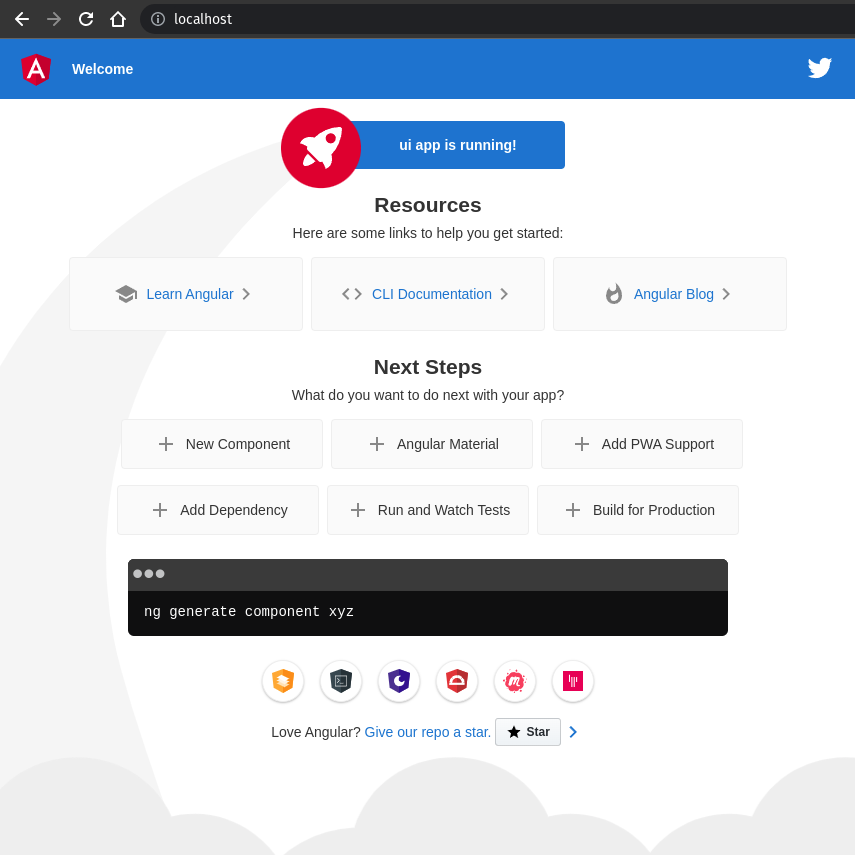
If we hit localhost we should see the angular welcome page
 Now lets analyze the final image size by running
docker images

angular-example  latest     c19ef2f17f6f    19 seconds ago  22.1MB
<none>           <none>     75b2a1cae786    35 seconds ago  490MB
The angular-example image is our final Run Stage Nginx image which is about 22.1 MB
The image with < none > tag is our Build Stage Node Js Image which is about 490 MB
Now we can push our Nginx image with very little footprint to the registry & deployment.
As you can see if we would have used a single stage to build & run our Angular application we would have ended up with ~500 MB image and would have eaten up our storage & data consumption.
Similarly for a Java application we can separate the build stage and run stage.Where the build stage will have a JDK Maven Image, pull the source code & compile the JAR file.In Run stage we can just have the JRE image and copy the JAR artifact from the build stage and build our final image.

Since our build configuration is described inside our Dockerfile as a stage we can compile & build our app on any machine which just has Docker installed and nothing else. We can literally forget about the traditional method of preparing the server’s environment with the tools necessary to build our app.
CITATION
https://docs.docker.com/develop/develop-images/multistage-build/